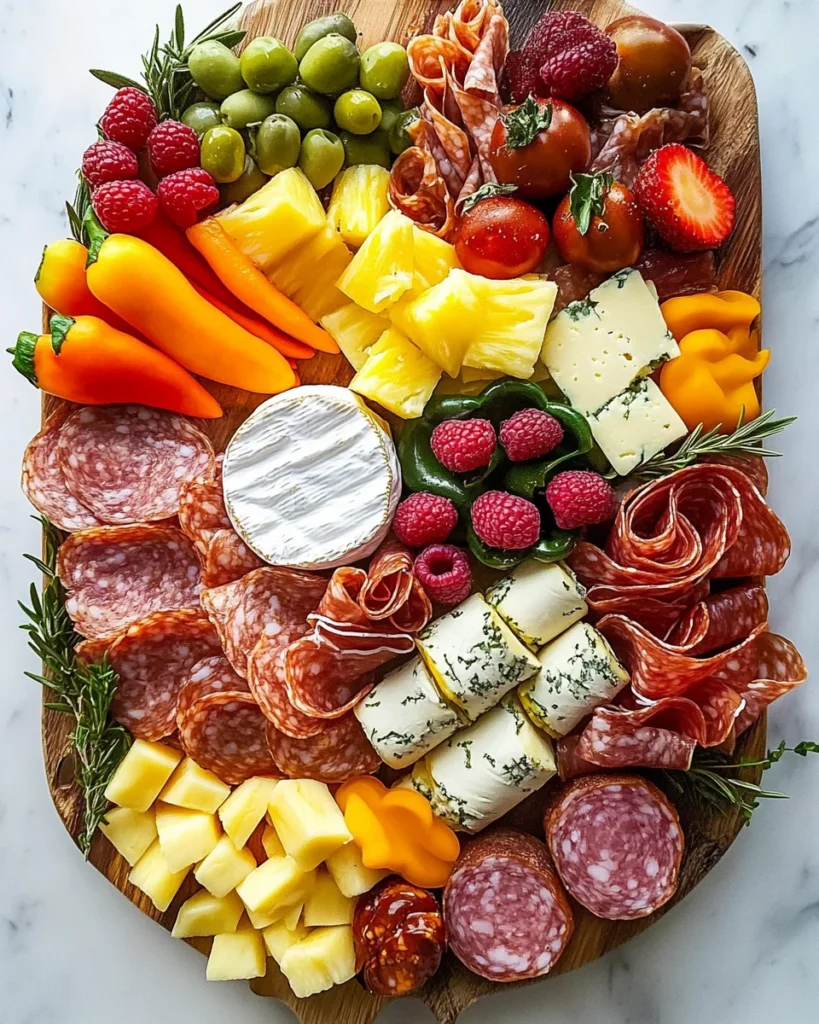
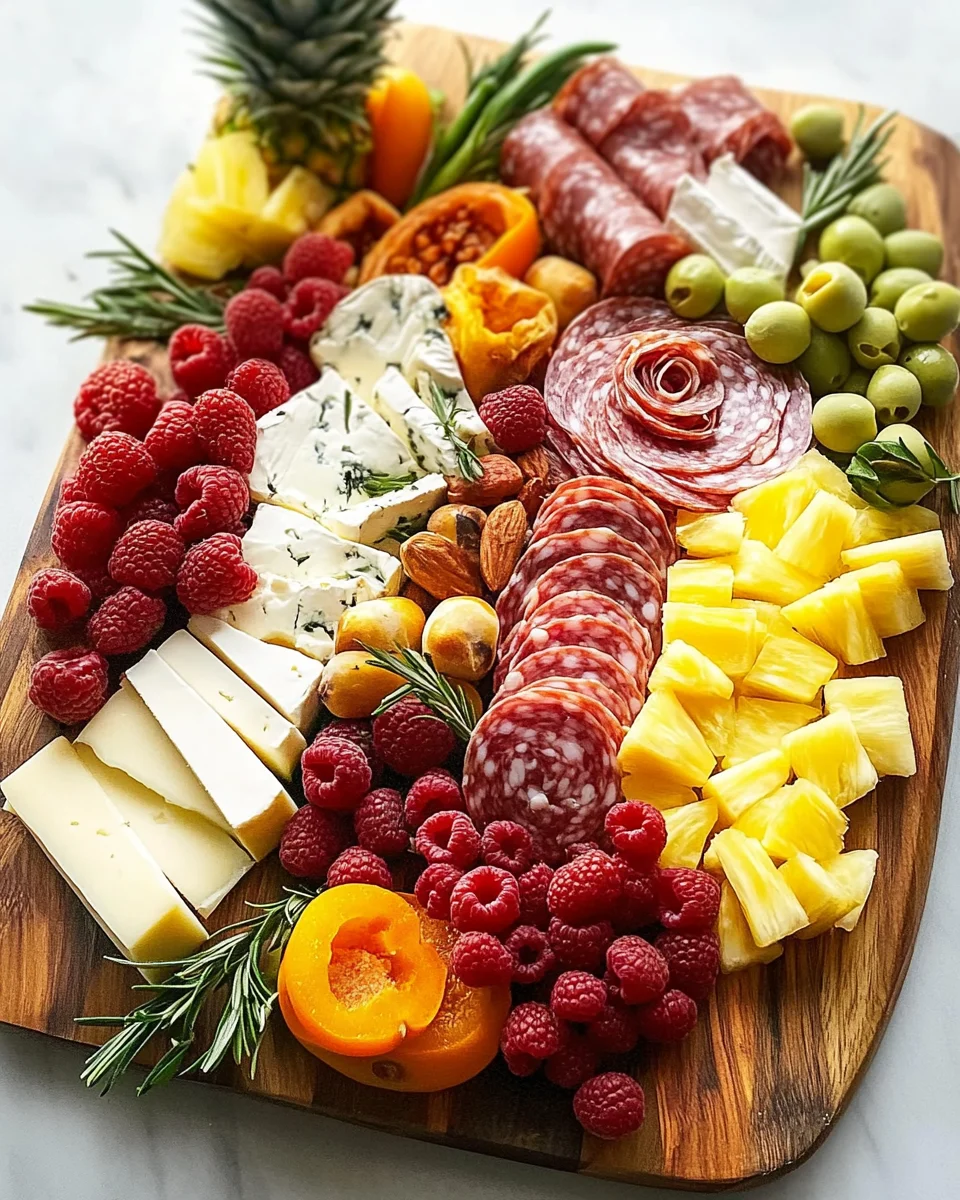
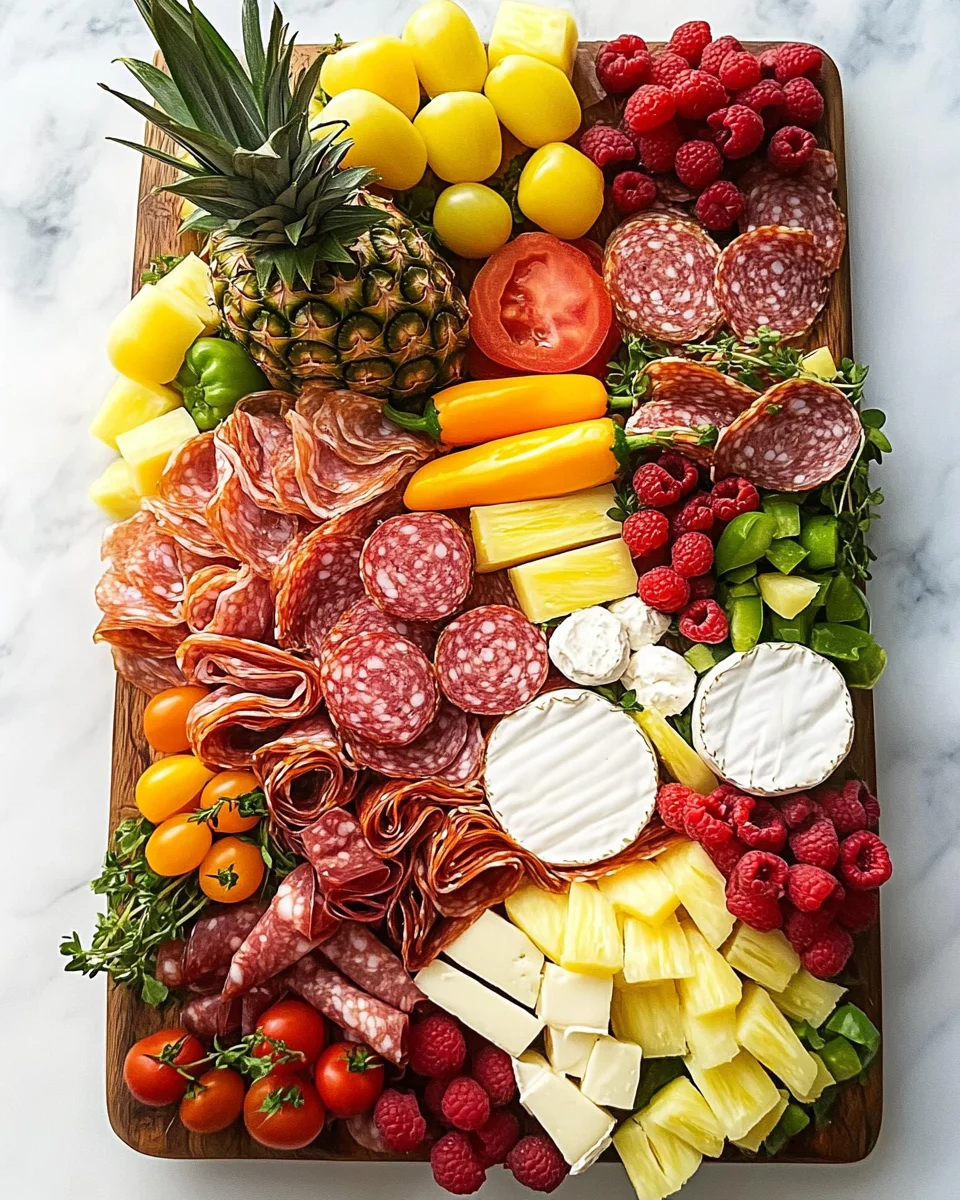
Create a showstopping grazing board that’s as beautiful as it is delicious, packed with meats, cheeses, fruits, veggies, & irresistible nibbles everyone will love. Be a Hosting Guru with this Ultimate Charcuterie Board! This crowd-pleasing nibble board is perfect for any occasion, from casual gatherings to elegant parties. Its vibrant colors and diverse flavors make it a true centerpiece that guests will adore.
Why You’ll Love This Recipe
- Easy to Assemble: This charcuterie board comes together quickly, making it perfect for last-minute hosting.
- Flavorful Variety: With an array of meats, cheeses, and fresh produce, there’s something for everyone to enjoy.
- Visually Stunning: The colorful presentation makes it a feast for the eyes as well as the palate.
- Versatile Ingredients: You can mix and match ingredients based on your preferences or seasonal availability.
- Perfect for Any Occasion: Whether it’s a birthday party or a casual get-together, this board fits right in.
Tools and Preparation
To create your stunning charcuterie board, you’ll need some essential tools. Having the right equipment makes the process smoother and more enjoyable.
Essential Tools and Equipment
- Large serving board
- Small round containers
- Sharp knife
- Vegetable peeler
Importance of Each Tool
- Large serving board: Provides ample space to arrange all the delicious ingredients without overcrowding.
- Small round containers: Ideal for serving dips and olives separately while keeping the presentation tidy.
- Sharp knife: Ensures clean cuts when slicing cheese or fruits for easy serving.
Ingredients
To create your ultimate charcuterie board, gather the following ingredients:
Meats
- 1lb sliced Oven Roasted Turkey, each slice rolled up
- 1lb Deli Roast Beef, each slice rolled up
- 1lb Black Forest Ham, each slice rolled up
- 1/2 pound prosciutto
- 1/3lb sliced soppressata
Cheeses
- 1lb wheel brie cheese
- 1/2 pound sharp cheddar cheese
- 1/2 pound sliced gouda
- 1/2-1 cup Cheese Curds
Fruits and Vegetables
- 4-6 Hardboiled eggs, sliced in half
- 2 medium zucchini, shaved into long thin strips
- 3 carrots, shaved into long thin strips
- 1 bag mini bell peppers
- 8 ounces fresh pineapple spears
- Seedless Grapes
- 1 pint fresh raspberries
- 1 pint small tomatoes (cherry or grape)
Other Essentials
- 1-2 cups each kalamata olives and green olives
- 2 cups French Onion Dip
- Assorted Crackers and Breadsticks
How to Make Be a Hosting Guru with this Ultimate Charcuterie Board!
Step 1: Prepare Your Board
Grab a large serving board. Place the olives and dip into small round containers. Arrange these on the board spacing them out evenly.
Step 2: Add Meats and Cheeses First
Add the rolls of meats (turkey, ham, and roast beef) along with blocks of brie and cheddar cheese on the board first.
Step 3: Include Whole Vegetables
Next, add whole veggies like the mini bell peppers and cherry tomatoes. Follow these with larger cuts of fruits and halved hardboiled eggs.
Step 4: Fill in Gaps with Smaller Items
Now start filling in gaps by adding veggie curls from zucchinis and carrots. Include sliced gouda cheese, cheese curds, delicate fruits like raspberries, prosciutto, and soppressata.
Step 5: Final Touches
Place bunches of grapes around or on top of the board for that final flourish.
Step 6: Serve Your Masterpiece
Serve immediately or cover and chill until ready to serve. If not serving immediately, wait to add veggie curls until just before serving to keep them fresh.
With these steps complete, you’re ready to impress your guests with your beautiful charcuterie creation! Enjoy being a host that everyone talks about!
How to Serve Be a Hosting Guru with this Ultimate Charcuterie Board!
Serving your charcuterie board is as important as preparing it. A well-presented grazing board not only looks inviting but also encourages guests to dig in. Here are some serving suggestions that will make your charcuterie experience even better.
Create a Colorful Display
- Use a variety of colorful ingredients, such as red bell peppers, green olives, and vibrant fruits, to create an eye-catching arrangement.
Provide Small Plates and Napkins
- Offer small plates and napkins for easy serving. This allows guests to take what they want without making a mess.
Pair with Wine or Cocktails
- Suggest complementary beverages, like wine or craft cocktails, to enhance the flavors of the meats and cheeses on your board.
Include Tasting Notes
- Add small cards with tasting notes next to different items. This can guide guests through the flavors and pairings available.
Make It Interactive
- Set out toothpicks or skewers for guests to create their own bites. This interactive element can add fun to your gathering.
How to Perfect Be a Hosting Guru with this Ultimate Charcuterie Board!
To truly master your charcuterie board, consider these helpful tips that ensure your presentation and flavor combinations are top-notch.
Choose Quality Ingredients: Select fresh meats, cheeses, and produce for maximum flavor impact.
Balance Flavors: Mix sweet, salty, and savory items for a delightful tasting experience.
Vary Textures: Include crunchy crackers alongside creamy cheeses for an exciting texture contrast.
Seasonal Touches: Incorporate seasonal fruits or herbs for freshness and visual appeal.
Keep It Chilled: If serving outdoors or in warm conditions, ensure perishable items stay cool by using ice packs underneath the board.
Mind the Portions: Aim for bite-sized servings so guests can sample multiple items without overindulging.
Best Side Dishes for Be a Hosting Guru with this Ultimate Charcuterie Board!
Adding side dishes can elevate your charcuterie experience further. Here are some delicious options that pair perfectly with your ultimate charcuterie board.
Stuffed Mushrooms: Baked mushrooms filled with cream cheese and herbs offer a savory bite alongside your grazing board.
Bruschetta: Toasted bread topped with tomatoes, basil, and balsamic glaze adds freshness and crunch.
Caprese Salad Skewers: Cherry tomatoes, mozzarella balls, and basil leaves drizzled with olive oil provide color and taste.
Mini Quiches: Bite-sized quiches filled with vegetables or meats can be made ahead of time for easy serving.
Vegetable Platter: A simple assortment of carrots, celery sticks, and cherry tomatoes served with hummus complements the flavors on your board.
Fruit Salad: A light fruit salad featuring seasonal fruits can cleanse the palate between cheese tastings.
Pita Chips: Crispy pita chips are great for dipping into spreads like hummus or tzatziki alongside your charcuterie options.
Savory Scones: Cheese scones or herb scones offer a unique twist that pairs beautifully with meats and cheeses on the board.
Common Mistakes to Avoid
Creating the perfect charcuterie board can be a fun experience, but there are some common pitfalls to watch out for.
- Selection of Ingredients: Using too many similar flavors can make your board bland. Choose a variety of meats, cheeses, and fruits to create a balanced taste profile.
- Overcrowding the Board: Stuffing everything onto the board can make it look messy. Arrange ingredients thoughtfully to create visual appeal and easy access for guests.
- Forgetting Dietary Restrictions: Ignoring guests’ dietary needs can lead to disappointment. Always check in advance if any guests have allergies or preferences (vegan, gluten-free).
- Skipping Aesthetics: Neglecting the visual layout can reduce the wow factor. Use different heights and colors to make your charcuterie board visually stunning.
- Not Preparing Ahead: Waiting until the last minute can lead to stress. Prep ingredients in advance to allow time for assembly and adjustments.
Storage & Reheating Instructions
Refrigerator Storage
- Store leftover charcuterie in an airtight container.
- Consume within 2-3 days for best freshness.
Freezing Be a Hosting Guru with this Ultimate Charcuterie Board!
- Freezing is not recommended due to texture changes in meats and cheeses.
- However, you can freeze individual components like dips or certain fruits.
Reheating Be a Hosting Guru with this Ultimate Charcuterie Board!
- Oven: Preheat to 350°F (175°C) and warm for 10-15 minutes.
- Microwave: Heat on medium power for 1-2 minutes; check frequently.
- Stovetop: Warm delicate ingredients over low heat until heated through.
Frequently Asked Questions
How to make a charcuterie board look appealing?
Arranging items by color and texture creates visual interest. Layer meats, cheeses, and fresh produce creatively while ensuring accessibility.
What are the best foods for charcuterie?
The best foods include various meats (prosciutto, salami), cheeses (brie, cheddar), fresh fruits (grapes, berries), nuts, olives, and dips.
How to assemble a charcuterie board effectively?
Start with larger items like cheese blocks and meats. Fill gaps with smaller items like olives and nuts. Ensure each item is easily accessible.
How do I keep a charcuterie board cold?
Use ice packs beneath the serving tray or serve on chilled platters to maintain freshness during outdoor events.
Final Thoughts
Becoming a hosting guru with this ultimate charcuterie board is all about creativity and personalization. You can customize it with your favorite ingredients, ensuring that every guest finds something they love. Try different combinations for endless possibilities!
Be a Hosting Guru with this Ultimate Charcuterie Board!

Create a stunning charcuterie board that dazzles the senses and delights your guests! This Ultimate Charcuterie Board combines a beautiful array of meats, cheeses, fresh fruits, and colorful vegetables, making it the perfect centerpiece for any gathering. Whether you’re hosting a casual get-together or an elegant party, this crowd-pleasing platter is not only visually appealing but also offers a variety of flavors to satisfy every palate.
- Prep Time: 20 minutes
- Cook Time: None
- Total Time: 0 hours
- Yield: Serves approximately 8 people
- Category: Appetizer
- Method: Assembling
- Cuisine: Varied
Ingredients
- 1 lb sliced Oven Roasted Turkey
- 1 lb Deli Roast Beef
- 1 lb Black Forest Ham
- ½ lb prosciutto
- ½ lb wheel brie cheese
- ½ lb sharp cheddar cheese
- 4-6 Hardboiled eggs
- 2 medium zucchini (shaved)
- Mini bell peppers
- Fresh pineapple spears
- Seedless grapes
- Kalamata olives and green olives
- Assorted crackers and breadsticks
Instructions
- Begin by selecting a large serving board. Place small round containers filled with olives and dips on the board.
- Arrange rolled meats like turkey, ham, and roast beef alongside blocks of brie and cheddar cheese.
- Add whole vegetables such as mini bell peppers and halved hardboiled eggs for color.
- Fill in gaps with zucchini curls and sliced gouda cheese along with fresh fruits like raspberries and grapes.
- Complete your presentation by adding decorative bunches of grapes.
Nutrition
- Serving Size: 200g
- Calories: 350
- Sugar: 7g
- Sodium: 980mg
- Fat: 20g
- Saturated Fat: 8g
- Unsaturated Fat: 10g
- Trans Fat: 0g
- Carbohydrates: 22g
- Fiber: 3g
- Protein: 20g
- Cholesterol: 70mg